This week with the Sisters in Stamping we are sharing cards made with designer paper and specialty papers. Don't be afraid to use your paper. I know we can be hoarders at times because they are just so pretty, but use them and let others enjoy the beauty too.
Lately, I have been letting my paper do all of the work leaving me little stamping. Basically, I just have to stamp a greeting because I cut images from the paper and use that instead of stamping.
Don't forget to head over to Sisters in Stamping for more great ideas using specialty papers.
Today's post is a fun blog hop where we get to CASE A FRIEND. Case means to copy and steal everything or copy and share everything if you want it to sound a little nicer than stealing. I often copy projects when I am tight on time or lacking some creative juices. Do you look for ideas from others? There's absolutely nothing wrong with it. Use the inspiration around you when you find yourself in a creative block or you just love what one of your friends created.
For my card, I copied my friend Patty. She is a demonstrator friend from Connecticut. She has retreats a few times a year and I travel up to Connecticut to be with her and the rest of her stamping friends. This is one of the projects all attendees of a retreat made.
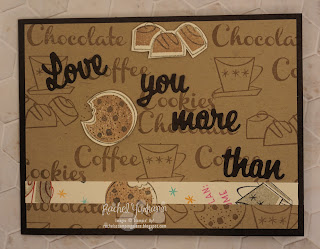
Nothings Better than Chocolate is a perfect set for me. I LOVE CHOCOLATE. I added a few extra little details from Patty's original card to make it a little bit of my own. I added a little strip of the "designer paper" we stamped for other projects to give it a little color (and I mean just a little).
The fun part is when you open the card it has a little interactive fold. So much fun to create and even better for the person receiving the card. It's an extra little surprise. This is a very easy way to make your card interactive without a ton of extra work.
Just another angle so you can see what it looks like so you can make your own. Order your materials to make this card on my website today. Don't delay.
Keep hopping by clicking the links below. Thanks for the inspiration for a great project Patty.
Hope you are having a great day. Today is the day for the monthly blog hop with the awesome group, the Stampers Dozen. Be sure to scroll to the bottom to keep hopping.
I saw a similar card awhile back and wanted to make my own. The colors and flower were different, but I wanted to use this great sunflower die on my creation. So I chose the different yellow tones that Stampin' Up! offers. And of course, Early Espresso for the outline of the flower.
In order to make the lines, I cut 5 different strips of cardstock that are 4 1/4" x 1/2". I attached those piece to a 4 1/4" x 2 1/2" piece of basic white cardstock because I needed those tiny little edges on each side of the card to stay together. It would have been way too tedious to try to attach adhesive and adhere to the base lining them up exactly where I wanted them.
Then I continued with the rest of the layering. I used the Multipurpose adhesive to attach the frame and the flower outline since they are so delicate.
Remember to keep hopping. Thanks for stopping by.
Order your supplies by clicking on the products below.
Today I'm hopping with Crafty Collaborations and the theme is Fantasy. What would that theme mean to you?
So for me fantasy meant mermaids. (Side note: when I was in high school one of my favorite movies was the Little Mermaid. My friends and I would pop our cassette tape in while cruising around and we would belt out all the songs on the soundtrack. Man, I miss those days.) However, after making this card (even though I absolutely love how it turned out) I decided the fantasy part of this card was that I would make another one like it. It was a lot of work stamping the greeting in different colors, stamping and coloring three different mermaids and then cutting them out.
I used the Highland Heather pad to make the cardstock look like it had waves. I just brushed the pad lightly along the cardstock until I achieved my desired look. I also stamped the greeting in highland heather and coastal cabana alternating after each time I stamped. Then I filled in with some daffodil delight starfish to close any gaps. I covered it with the metallic mesh trim to give it the look of water and/or netting since they are under the sea. (Yep, like that cheesy reference. No shame here.)
The mermaids were colored with Stampin' Blends. I then added a little shimmer using the Wink of Stella glitter brush. Those mermaid scales should definitely sparkle in my opinion.
I then stamped the greeting three times on the inside of the card and place a few starfish in the bottom corner. Honestly, I love how this card turned out, but I probably wouldn't suggest making a bunch of them. This would be for a special birthday girl.
This is my personal blog. I am an Independent Stampin' Up! Demonstrator and responsible for its content. Stampin' Up! does not endorse the use of or contents of the classes, services, or non-Stampin' Up! products I may offer here.


")


")