Sunday, March 28, 2021

Under My Umbrella on a Rainy Day

Hello Stamping Friends,

It's Sunday Fun Day with the Sisters in Stamping. This week we are sharing with you cards that we cased. (Well, in my case cased and made my own. Sorry, I just can't help myself) Let's be honest here, how often do you copy a card you see exactly as it is? Don't you change the colors or stamp set? Maybe add an embellishment or two?


I didn't plan to share this card just because it is a rainy day, but it is a rainy day in the northeast region of the U.S., so it's perfect for the weather. I think even though it is a rainy day card, the brightness is so cheerful that it's okay.


This is a card with a folded piece inside because otherwise you would see the message through the window sheet. See the picture below to really understand what I'm talking about. I stamped the images for the boots and the umbrellas on bright colored designer series paper and then cut them out. The grass I just snipped about halfway down on a strip of designer paper. I seriously love how cute this card is. 


See what I mean now? The inside piece is cut at 4"x8" and folded in half before being attached to the base.  I stamped a little greeting in the center and then the raindrops around it because you need rain with umbrellas.


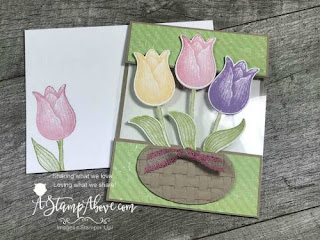
Below is the card that I "copied." Can you at least see where my inspiration came from. I changed the layout of the card to landscape and obviously changed the stamp set. However, tulips and umbrellas both scream spring to me. 


Don't forget to visit the Sisters in Stamping blog for more inspiration.


Product List

Share It Sunday Blog Hop

Hello Stamping Friends,

It's time for another Share it Sunday blog hop. That was a fast month. Whew. How in the world does time go so fast any more?


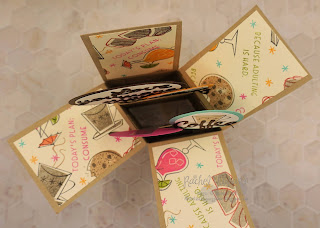
Remember the candy bar I shared with you last week using the "designer paper" I made? Well, this is another card made using that hand-stamped "designer paper." This is a fun pop-up card that I made at a retreat one of my demonstrator friends hosted that I attended recently. I love how she designed it and honestly didn't even change anything. That says a lot because I usually put my own spin on things. Not that I mean to or dislike what they did, it's just because my brain just starts thinking more and more.


This is a regular card base (5 1/2" x 8 1/2") that is scored at 2", 4", 6", and 8". The 1/2" left over is where you place the adhesive to make your box. Then you score at at 2 3/4" on the long side and cut up to the score line on the 2", 4", 6", 8" because that will be the top part of your card that fall down to see what's inside. 


The "designer paper" is cut at 1 3/4" x 2 1/2". You will need 8 of those pieces. Adhere four on the inside parts that fall and then four on the bottom outside pieces. For the pop-up parts you will need 2 pieces of 2 1/2" x 1/2" strips of cardstock. Score each one a 1/4" on each side and adhere to the inside of the box. Then decorate any way you would like. This card used strips of window sheets for the pop-up pieces so you don't see them.


And here's the full sheet of my hand-stamped "designer paper." I love the way it turned out and it was very  much like regular designer paper: it's so pretty you don't want to cut it. The really cool thing about this card is that it folds flat and fits in one of our envelopes so they are great to mail.


Product List

Sunday, March 21, 2021

Sisters in Stamping Favorite Bundle

Hello Stamping Friends,

It's Sunday and that means a great Sunday Fun Day post with the Sisters in Stamping. This week we are sharing with your our favorite bundles from the January - June 2021 Mini Catalog. There's so many it's so difficult to select just one!


Honestly, I can't pick just one. I love the hydrangea, the strawberries, the dragonflies, the ice cream, the hearts & kisses (love the lipstick), and so much more. However, the theme was one and besides, it would be an awful interesting card if I used a little bit of all of my favorites. (LOL)


And since, I've shared cards recently from each of those bundles, I figured you'd rather see a card using just one, right?  I used the Dragonfly Garden bundle and the coordinating designer series paper for this card. The little dragonflies are actually cut right rom the paper. You can even cut the big one from one of the sheets if you'd like. I stamped the inside with the thank you for your kindness stamp with enough room to write a little message to the recipient.

Don't forget to head over to Sisters in Stamping for more bundle inspiration.

Thanks for stopping by. See you soon. And if you'd like to order anything, you can click on the links below to go directly to my store.


Product List