Friday, December 14, 2012

I'm Back!!!! And ready to share.

Hello Stamping Friends,

I'm baaaaacccccckkkkk.  Sorry for the delay in posting. I have been super busy around here. It's that time of year afterall. Plus I've been subbing just about everyday. But I'm done with prepping for classes for the rest of the year (yes, I know that's only 2 weeks, but let me believe it's longer with saying that, lol)

I have a lot to share with you over the next week, so be sure to come back and check out what I have everyday. Today is Fabulous Friday at Sisters in Stamping. Our theme this week is ornaments. 

 
I shared a similar ornament last week for the 12 weeks of Christmas. (Check out last week's post to purchase the tutorial, it also has a second ornament included) This uses a different piece of designer paper from the Be of Good Cheer pack. I love how just changing the paper gives it a whole new look.  These ornament would be great to attach to the top of the gifts you are giving this season.  Then your lucky recipient can hang it on their tree for years to come.
 
Don't forget to check out the Sisters in Stamping blog for more ornament ideas. You are going to love them. And be sure to come back tomorrow. I have 3 ornaments to share with you that a few of the gals on my team made.
 

Sunday, December 9, 2012

A Hand Made Christmas


Hello Stamping Friends,

Today I'm debuting the tutorial for Week 10 for theTwelve Weeks of Christmas.  And that means there is ONLY 2 more weeks left before Chrismtas Day. Boy oh boy do I have my work cut out for me in the next two weeks. Lots of shopping, wrapping, baking, stamping and so much more to get done. I can do it, I can do it. That's how I'm gonna get through it.

This week's tutorial is for you to make 2 Christmas ornaments to decorate your tree.  I personally love homemade ornaments.  I've done an ornament exchange for years and absolutely love pulling out the ornaments everyone year and remembering the person who made it. Brings lots of smiles every holiday season. And now there's two more ornaments for you to make for your tree or to add to a gift for the recipient to adorn their tree.

 
As with all tutorials for the 12 Weeks of Christmas you can purchase the tutorials individually or the complete set of 12. Just click the appropriate link below and the tutorials will be sent to you.
 
Click below if you would like to purchase the ornament individual tutorial.

12 Weeks of Christmas Week 10


Click below if you would like to purchase the complete set of 12 tutorials.
 

Friday, December 7, 2012

Quick & Easy Gifts

Hello Stamping Friends,
 
Sorry I didn't stop by yesterday to say hello and give you some inspiration. Life has beena little hectic here. I've been subbing a whole lot (which is a good thing) and then I have had a lot of stamping events (another good thing) but I just think it's catching up to me. I think I'm like one of the kids and am really looking forward to Christmas vacation. No alarms, no places to be, just home and relax.
 
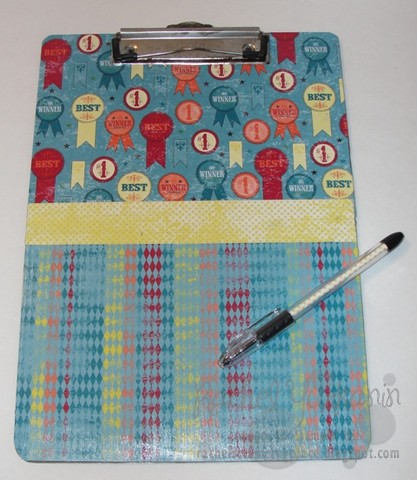
No time for relaxing now. I have to finish this post and get ready for school. This week at Sisters in Stamping we are showcasing projects that are quick and easy gifts you can make for this holiday season.  I altered a plain old boring clipboard using our designer paper and some mod podge and spruced up a pen so that it would match. I think these would make wonderful teacher gifts.  You can personalize it according to the teacher (or any other person's) interests or likes. 
 
 
I mean really who wouldn't love to receive one of these. I love the fact that our designer series paper packs make creating so easy. I didn't have to go anywhere but one pack of paper to find three coordinating designs to complete this clipboard. And it looks great (a little Tony the tiger coming out in me, lol)!
 
My paper pieces are 6" x 9"(two different pieces) and then 1 1/2" x 9" for the middle piece. Just know the measurements of your clip board and then you alter your paper measurements accordingly.

 
Here's a close up of the pen. Just cut a pieces of designer series paper to 1" x 3 1/4", take the inside of the pen out and roll the paper around the ink. Insert back into pen case and you are FINISHED. Easy peasy, right?

 
Just another view of the pen, a little further away.
 
Don't forget to head over to Sisters in Stamping for more gift inspiration.


Wednesday, December 5, 2012

Get Your Ornamental Elegance Kit - Only While Supplies Last

The ornament on the cover of our holiday catalog has been such a hit that Stampin' Up! is making it available to you --just in time to deck the halls with terrific trimmings you've made yourself!


We've simplified this fun project so that you can quickly and easily achieve the same results. In addition to the kit, all you need is a glue gun, scissors, and adhesive. (Our Anywhere Glue Sticks [104045] are perfect for assembly.)

Want greeting or place cards to go with those ornaments? The Ornament Keepsakes Stamp Set (W 128048 C 128051) gives you perfect coordination.

Fancy a little sparkle and shine? Sprinkle on our Dazzling Diamonds Stampin' Glitter (102023)!

Take advantage of this amazing offer--just in time to create 10 heirloom ornaments--or stunning tags to attach to a special neighbor gift.

The Ornamental Elegance Kit (132832) is $14.95 and includes:
  • Die-Cut Cardstock Elements
  • Cherry Cobbler 3-1/2" Scalloped Tulle Ribbon
  • Natural Linen Thread
  • Vintage Faceted Designer Buttons
  • Large Pearl Basic Jewels
Order these now so you will have plenty of time to make them for Christmas gifting--or for your family tree! Available while supplies last.

Monday, December 3, 2012

Snowy Season's Greetings

Hello Stamping Friends,
 
Today is the last of the three cards from last week's stamp a stash class.  Now that you saw the cards, don't you wish you attended that class?  I'm sorry you didn't but don't worry, there's another Christmas stamp a stash scheduled for December 13, so there's still time for you to get some Christmas cards made. And they will all be different from November's class.
 
 
This is certainly a snowy Season's Greetings. As mentioned previously, I love blues and purples together for snowflake cards and projects. So, of course, I needed to use my favorite wisteria wonder and pool party combo for this snowy card.  This is a quick and pretty easy (minus the cutting for those of you who don't like to cut) card to make multiples of. And even the cutting isn't that bad.  I love the jumbo pearl on the center of the snowflake. It's the perfect little touch.  I didn't add any dazzling details glitter to it but now that would be the really perfect finishing touch. Well, that's my opinion anyway.

Stamping Supplies Used:
Stamps: Curly Cute, Snowflake Soiree
Ink: Pool Party & Wisteria Wonder
Cardstock Pool Party, Wisteria Wonder & Whisper White
Accessories: Jumbo Basic Pearls, Dimensonals, Paper Snips, Snail Adhesive

Sunday, December 2, 2012

Another Frosty Cards for You

Hello Stamping Friends,

I'm back with yet another Christmas card for you.  This is card number two from last week's Stamp a Stash class. All cards were made with snowmen or snowflakes so they were wonderful Christmas cards but they can easily be changed into a winter thank you, birthday, or thinking of you type card by simply changing the greeting because snowmen and snowflakes are great all winter long (well, by February they aren't so great anymore if you live in the Northeast, by then you are pretty well finished with them).

 
I just loved the Stylin' Snowfolk set when I saw the new catalog that I just had to have it. I love snowmen, and a set that I can create a lot of different looking snowmen ans snowwomen was just going to be a have to have kind of set.  Well, I got it awhile ago and this is the first time it saw some ink and paper.  Now that I finally pulled it out, I NEED to create even more with it. You will be seeing more snow people in your future, I promise.
 
When I was thinking about the design of this card, I wanted black and white but I was a little afraid it wouldn't look right. But I wanted white snowflakes on the black so I decided to forge ahead with it anyway. And I must admit that I really love how this card turned out. I think it is my favorite from stash. I was afraid it would be too "dark" looking but I think it turned out looking great.  The little pop of red with the buttons and scarf and the orange carrot nose is the perfect pop.
 
Stamping Supplies Used:
Stamps: Stylin' Snowfolk
Ink: Whisper White, Basic Black, Real Red, Early Espresso, and Tangering Tango
Cardstock: Whisper White & Basic Black
Accessories: Paper Snips, Dimensionals, Snail Adhesive


Saturday, December 1, 2012

Week 9 - Twelve Weeks Of Christmas

Hello Stamping Friends,

Here we are at week 9 of the 12 Weeks Of Christmas Tutorials. Time is just going by way too fast for me. There's so much to do and so little time to do it all. However, I know somehow I will get it all completed, just don't ask me how I do it.

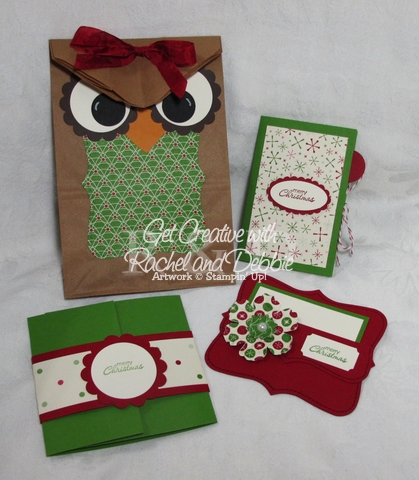
Here are some fun ways to wrap up your gifts this holiday season – a trio of gift card holders and a cute gift bag perfect to jazz up those smaller gifts! With a single pack of the Be of Good Cheer designer series paper you’ll easily be able to make as many of these as you’ll need!

 
As always you can buy just this week's tutorial for $3.95 or you can buy the complete set of 12 Weeks of Christmas tutorials for $24.95. The choice is yours. Click the appropriate link below.
 
If you would like to purchase just this week's tutorial, click the buy now button below. 
12 Weeks of Christmas Week 9

 
If you would like to purchase the complete set of 12 Weeks of Christmas tutorials, click the buy now button below.

12 Weeks Of Christmas Complete