Showing posts with label sticky pages. Show all posts

Monday, October 11, 2010

The last of the glitter, but only for now!

Here is the final installment of my glitter, sticky pages, and big shot projects that I made for my Workshop Wow presentation at the Baltimore Regional Stampin' Up! held last weekend.  I'd love to hear your thoughts and see your creations using this technique.  Please do share.

This shamrock was made using the Hearts & Brackets die.  I used the smaller heart and the smaller bracket to make the shamrock.  Just place three hearts (tips together) to form the shamrock top.  Use half of the small bracket to make the stem of the shamrock.  This card uses Stampin' Up! chunky glitter.  When using the chunky glitter you should be sure to press the glitter down (after you "dump" it on) because it doesn't like to stick the first try.


This card uses the larger heart and brackets from the same die that was used to make the shamrock.  I really like the red and gold glitter together.  I even used Stampin' Up!'s brushed gold cardstock for one of the layers.


And finally, this bird card was the card that I was going to make at the Syracuse regional which was supposed to be held back in February but was cancelled due to that horrendous snow storm we received the last week in February.  I was asked to present a workshop wow at that event and was really sad that I didn't get the chance to show everyone this fun technique.  However, I did get to do the presentation in Baltimore but this little beauty was left out because the bird flew away (AKA retired) the end of June.  I decided to show the card anyway because you can now get the die on the clearance rack at a great discounted price.  Soooo, if you really like this card, head over there, choose me as your demonstrator and get yourself one of these before they are gone.

These cards are a lot of fun to make and I promise there will be more of them in your future.  Look at that I'm a fortune teller now.  LOL


Sunday, October 10, 2010

Glittery "BOO" for you

Here is one of the last of my glittery projects that I made for my Workshop Wow presentation for Stampin' Up!'s regional seminar in Baltimore last weekend.  I do have two more ideas for tomorrow.  And I have several more ideas swirling around in my head, so you WILL be seeing more glitter projects in the future.

This first one was a modified version of a BOO banner we made at my Big Shot Club in September.  For this one I enhanced it by die cutting the letters B-O-O from the sticky pages. The base of each letter is cut with the scallop square die.  I cut a piece of the on board chipboard as well as a piece of basic black cardstock.  The ribbon is sandwiched between those two layers.

I also used the awesome new owl punch to make the cute little ghosts. And the bat punch was used for the little bat accents.  I also added some buttons with ribbon threaded through the holes in between the letters for some added umph. I was sure to make each letter  little different from the others. 


For the "B" I embossed the peach parfait cardstock with the perfect polka dot embossing folder (my ultimate favorite embossing folder, I love polka dots).  I used purple and black glitter on the "B" but cutting the orange plastic on a diagonal.  The little ghost has rhinestone eyes to just add some more bling.


The first "O" was stamped using the spider web from the Wicked Cool stamp set in whisper white.  I used only a portion of the ghost to have it peeking out of the center of the "o"  I used olive and black glitter on this letter.


The last "o" background was embossed with the spider web embossing folder.  The spider web is brushed with the whisper white pad (like I did in Friday's Halloween Treat Holder). I used orange and black glitter on the letter.  Each of the black scallop squares were dotted using the white gel pen to finish it off.

Why don't you try making one of these  They are a lot of fun and you can just change the theme to FALL, JOY (for Christmas), etc.  I'd love to see what you come up with. 

Saturday, October 9, 2010

Glitter, Glitter, Where have you Been?

And we have 3 more glitter cards for you today.  Hope you have been enjoying these cards and are a little inspired to go out and try you hand at making some glittery creations.  Stampin' Up! asked that we make 3-4 additional cards that went along with our project.  As you can tell, I did a few more than that.  I had so much fun creating that I just couldn't stop.  LOL  I even have a few more ideas in my head waiting to get down on paper.  I'll share them soon.

This card used the snowflake die. A couple of years ago I saw wrapping paper that was snowflakes in blues and purples and I fell in love with the combo.  That's where this idea started at.  I used the hobby blade to cut the orange plastic covering the sticky part into separate areas.  I peeled off all the ends of the snowflake and the center and poured on the purple glitter. Flicked off the excess, took the remaining orange plastic pieces off and then "dumped" on the blue glitter.


This card used the star die.  I call this my Stars and Stripes card.  Same technique as above. Cut the orange plastic on each star in half (after it was attached to the cardstock). Peeled off one section of each star and "dumped" on the red glitter.  Shook it off and flicked. and then peeled off the other piece of orange plastic and dumped on silver glitter.  This card was a little more labor intensive because I ""stitched" each star with the white gel pen.


This card I used the lattice die and just made a simple and elegant black and white card that can be used for any formal occasion.  Tip: Peel off one corner of the lattice die, place that on your cardstock and slowly peel away the rest of the paper backing while pressing onto your cardstock.

Remember when doing this technique, you die cut a piece of the sticky pages, peel off the white paper backing, attach that to your cardstock, and then cut (if desired) and peel off the orange plastic, and finally "dump" on your glitter.

I still have a few more projects to show you using the glitter from my presentation so come back tomorrow.

Thursday, October 7, 2010

Even more Glittery Projects

I have more glittery projects for you today from my presentation this past weekend in Baltimore at Stampin' Up!'s Regional Seminar.  And I promise I will have even more on Saturday. But I will need to take a break from them on Friday because of the regularly scheduled Sisters in Stamping Fabulous Friday posting that will take place. And you will certainly want to come back tomorrow because we are focusing on Halloween treat containers.

This is a close up of the bag tag that I made for each of my downline members that attended the Regional seminar in Baltimore and a few of the Stampin' Up! staff members whom I know.  I used the Beautiful Butterfly die for the big shot and the tags die as well.  The tag is made by covering one of our on board sheet with the Sweet and Sour Specialty Paper (I attached the paper using the "green" glue (aka Tombo Multipurpose Adhesive) on both sides and then die cut it.


I also punched a scallop circle and dotted the scallops with a white gel pen.  I used rose pink and orange glitter.  And to finish the butterfly off I added some rhinestones for the body.  The ribbon used was the orange striped grosgrain, pretty in pink 5/8" grosgrain and the gorgeous newChantilly crochet trim.  Each tag was finished off by die cutting the Naturally Serif alphabet decroative strip and adding each person's name.  I really love how these turned out. Of course, I think these look so much better in person.


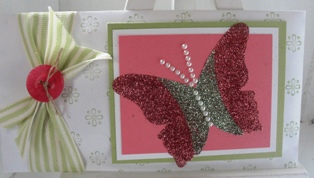
This is a potpourri sachet envelope (much prettier than the ones you can buy in a store, right?)  I used Stampin' Up!'s long open ended envelopes.  I stamped the pretty pattern background stamp on both sides of the envelope.  I used the larger butterfly from the Beautiful Butterfly die for this one.  The glitter is pink and celery.  This time I used the basic pearls for the body and even added some antennae.  I finished the envelope off with some striped celery grosgrain ribbon and a button tied on with linen thread.

Thanks for stopping by and remember to come back tomorrow for some Halloween treat ideas.

Wednesday, October 6, 2010

3 More Glittery Fun Cards

I promised you I would share more projects from the presentation this past Saturday at Stampin' Up!'s regional seminar in Baltimore.  And here there are:

The incentive trip all demonstrators are eligible to earn this year is a all expense paid trip for 2 in April 2010 to Disney World.  What better card to make than a Mickey ears card saying "So worth the wait"  I made this using the circles die and the fine black glitter.  Hard to see the sparkle on here but it really is there.  I also used the glitter brads that are found in the Holiday Mini Catalog.


Then I made this card using the Daisies die.  I was thinking of my Mom when I made this because it was her favorite flower.  I used gold glitter in the center and dazzling diamonds for the petals of the flowers.  They are attached to the top note die which is attached with dimensionals to the daffodil delight cardstock that is embossed with the perfect polka dots embossing folder.


And then I used the Blossom Party die to make this layered flowered.  I put the large flower down first and removed the orange sticky paper backing then placed the little flower in the center.  Leaving the orange plastic on the little flower, I "carefully dumped" the hot pink glitter on the large flower. I got off all the excess glitter and then removed the orange plastic from the little flower and placed the circle on top of that (again, leaving the plastic backing on). I dumped purple glitter on that flower, shook off the excess, peeled of the plastic cover and used silver glitter for the dot. 

TIP: Remember when layering to peel off the white paper backing before sticking image on top of another image.

Come back again tomorrow for even more project ideas using sticky pages and glitter.

Tuesday, October 5, 2010

Here it is, the card for my Workshop Wow

Saturday was such a great day.  I went to the Stampin' Up! regional seminar in Baltimore, Maryland.  I was lucky enough to have 5 of my downline members join me.  Three of them attended their very first Stampin' Up! event.  It was so exciting to watch them take it all in. Plus it was great because I had a cheering section for my Workshop Wow presentation.


Here I am with Bonnie Thurber from Stampin' Up!'s home office.  I met Bonnie a few years ago on the way to Manager's Reception at a Leadership Conference.  She is such a sweet lady and friend.  I was lucky enough to have Bonnie introduce me to the stage and she was there at the end to give me a hug. Made the whole presentation thing that much sweeter.


Here is the much anticipated Workshop Wow card.  In real life, it just sparkles and sparkles.  Hard to catch all the beauty in a picture.  Guess you'll have to book a workshop to see it or make one of your own. ; - )

The card uses sticky pages cut with the leaves die by running it through the Big Shot.  Once all the leaves were on the cardstock, I used a hobby blade to cut the orange plastic on the sticky pages to enable me to use multiple colors of glitter without making a huge mess.  I peeled one section of the orange backing at a time and "carefully dumped" the glitter on top of the cardstock.  Then you need to "dump" the glitter into the powder pal and "flick" off all remaining glitter.  (Those are the technical terms, dump and flick).

To finish off the card, I used the Falling Leaves set to fill in the excess bare spots on the cardstock.  I attached a gold brad in each corner and attached it to the card using nothing else but dimensionals.

I will share more of the projects with you tomorrow, so be sure to come back.